In summary:
- Transitioning to trad is a shift in mindset: you are not just a climber, but the manager of a complex safety system.
- Start your rack with a full set of nuts to master passive protection before investing heavily in cams.
- True proficiency lies in judgment: learning to read the rock, the weather, and your own mental state is more critical than physical strength.
- Adopt a non-negotiable procedural discipline for every aspect of climbing, from gear checks to anchor building.
For the gym climber accustomed to colourful holds and predictable falls, the first sight of a windswept Gritstone edge in the Peak District can be both inspiring and intimidating. The desire to make the leap from indoor bouldering to traditional (trad) climbing on real rock is a natural progression. You’ve likely heard the standard advice: « buy a rack, » « find a mentor, » and « just get out there. » While well-intentioned, this guidance often misses the fundamental shift that must occur.
The transition is not merely about acquiring new equipment or skills. It is a profound change in philosophy and responsibility. What if the key to a safe transition wasn’t in your gear bag, but in your head? The journey from pulling on plastic to leading a trad route is a deliberate evolution from being a performer in a controlled environment to becoming a meticulous manager of a complete safety system in a dynamic one. This is not about being fearless; it’s about being prepared.
This guide moves beyond the basics to instil the mindset of a Mountaineering Instructor. We will deconstruct the trad climbing system into its core components, focusing on the procedural discipline and critical judgment required. We will cover strategic gear acquisition, the art of evaluating your protection, understanding the unique ethics of UK climbing, assessing environmental hazards, and building the mental fortitude to make sound decisions when it matters most.
Summary: From Indoor Bouldering to Trad Climbing: A Guide to a Safe Transition
- Nuts or Cams: What Should You Buy First for a Trad Rack?
- How to Know if Your Nut Placement Will Hold a Leader Fall?
- Sport vs Trad: Why Bolting Gritstone Is a Major Taboo?
- The Rockfall Warning Signs Every Climber Misses
- When to Attempt Your First Multi-Pitch Route in North Wales?
- How to Read an OS Map When Your GPS Fails on the Moors?
- How to Use Visualization to Calm Nerves Before a Big Drop?
- How to Prepare for a Peak District Hike When Rain Is Forecast?
Nuts or Cams: What Should You Buy First for a Trad Rack?
The first visit to a climbing shop can feel overwhelming. The wall of shiny metal presents a critical first decision: where do you invest your money? The common debate is between nuts (passive protection) and cams (active protection). While cams offer seductive speed and ease of placement in parallel cracks, the correct answer for the aspiring trad climber is unequivocal: start with a full set of nuts.
This « nuts-first » approach is not about saving money, although they are significantly cheaper. It is a fundamental training principle. Learning to place nuts forces you to develop the most crucial trad climbing skill: reading the rock. You will learn to identify constrictions, flares, and textured surfaces, and to understand the physics of how a simple wedge can hold immense force. This builds a deep, intuitive connection with the rock that « point-and-shoot » cam placement can allow a beginner to bypass. Mastering passive protection first ensures you build a solid foundation of judgment.
The table below breaks down the core differences, but the real takeaway is that nuts teach you the theory, while cams are the application. A climber who can place a bomber nut can easily learn to place a cam, but the reverse is not always true. This initial investment in skill will pay dividends for your entire climbing career, a point reinforced by a recent comparative analysis.
| Factor | Nuts (Passive Protection) | Cams (Active Protection) |
|---|---|---|
| Initial Cost | $60-100 for complete set (10-13 pieces) | $80-110 per individual cam |
| Learning Curve | Steeper – requires understanding rock mechanics, constrictions, and force vectors | More intuitive – ‘point-and-shoot’ placement in parallel cracks |
| Weight | Lightweight (10-15g per piece) | Heavier (70-120g per piece) |
| Versatility | Best in tapered cracks with constrictions; limited in parallel cracks | Work in parallel and flared cracks; multidirectional hold |
| Durability | Extremely durable; no moving parts | Moving parts can wear; require inspection |
| Skill Development | Builds deeper understanding of rock quality, crack features, and placement theory | Faster to learn but may skip fundamental skills |
A structured approach, like the phased rack building strategy, is the most effective way to build your kit. Start with a foundation of nuts and a nut tool. Once you’ve logged a dozen routes and can confidently place passive pro, identify the three most common cam sizes for your local crags (e.g., sizes 0.5, 0.75, and 1 for Peak District gritstone) and add them. This incremental method ensures every piece of gear is bought with purpose and understanding.
How to Know if Your Nut Placement Will Hold a Leader Fall?
Placing a piece of gear is easy. Placing a piece of gear you would trust your life with is an art. For a gym climber, this is the single greatest mental hurdle. A « bomber » placement is the bedrock of your entire safety system, and developing the ability to assess it instantly and accurately is a non-negotiable skill. It’s a multi-sensory process that goes far beyond just slotting a piece of metal into a crack.
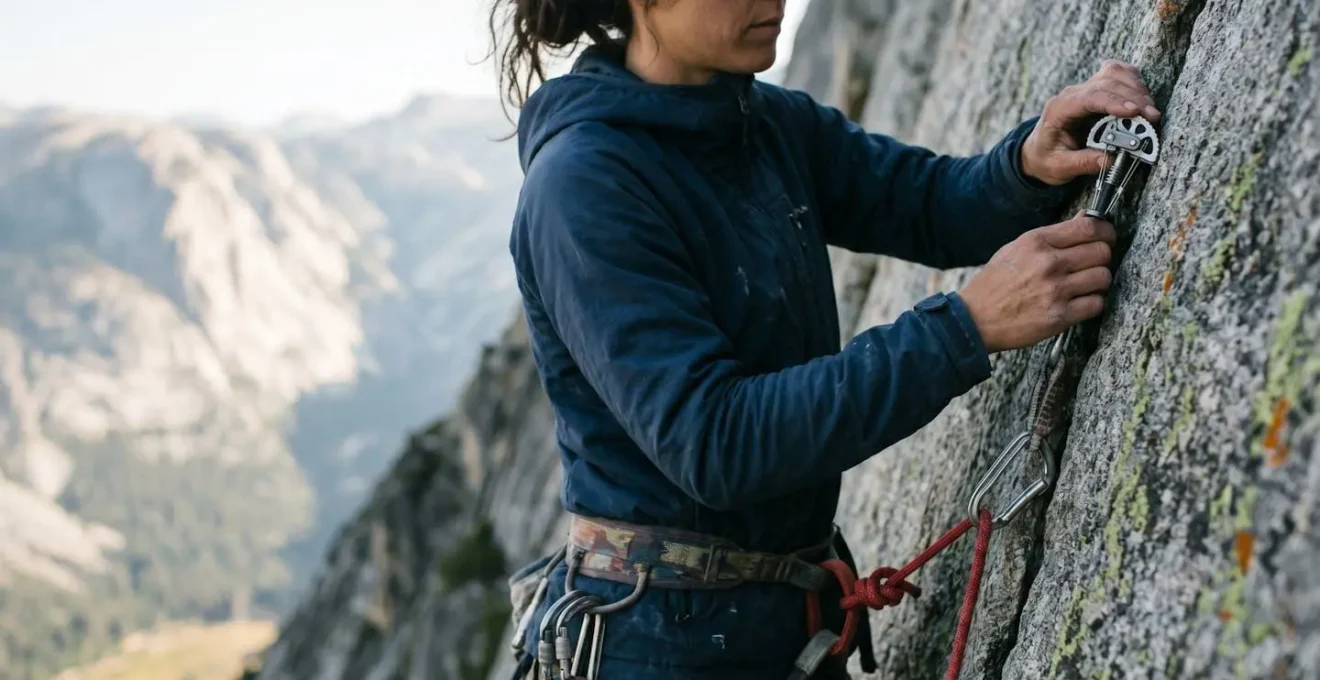
The goal is to achieve maximum security through three key principles: maximum surface contact, a solid constriction in the direction of pull, and placement in high-quality, solid rock. A perfect placement in a loose, fractured block is worthless. Your judgment of the rock itself is as important as your judgment of the placement. Before you even clip the rope, you should have a high degree of confidence built on a systematic evaluation.
As the image above illustrates, the quality of contact between the metal and the rock is paramount. You are looking for the nut to be seated snugly, with its faces flush against the rock. To build this confidence, adopt a rigorous, three-part test for every placement. This turns a hopeful guess into a confirmed assessment, a vital part of your procedural discipline.
The Three Senses Test for Bomber Placements
- LOOK: Assess maximum surface contact – the nut should sit flush against both sides of the crack with at least 50% of the nut body in contact with solid rock. Verify the placement is in a narrowing constriction, not a flared or parallel crack. Check the rock quality for fracture lines or hollow flakes.
- FEEL: After initial placement, give a sharp, downward pull on a clipped quickdraw to « set » the nut into its constriction. It must feel completely immobile and solid. Any shift, rotation, or « grinding » feel is a sign of a poor placement.
- SOUND: Gently tap the nut with your knuckle. A bomber placement will produce a dull, solid ‘thud’. A hollow or high-pitched ringing sound indicates poor contact or that the surrounding rock may be suspect.
Sport vs Trad: Why Bolting Gritstone Is a Major Taboo?
As you venture onto UK crags, particularly the iconic gritstone edges of the Peak District, you will notice a conspicuous absence of bolts. To a climber raised in a gym or on European sport-climbing limestone, this may seem archaic. Why not add bolts for safety? To ask this question is to misunderstand the very soul of British trad climbing. Bolting gritstone is not just frowned upon; it is considered a profound violation of climbing ethics.
This is not simple Luddism. The taboo is rooted in a deep, multi-faceted philosophy that combines geological practicality with cultural identity. First, the rock itself, a coarse sandstone, is relatively soft and porous. It does not hold bolts as reliably as granite or hard limestone, making them a structurally questionable choice. But the primary reason is cultural. The pioneers of UK climbing established a style that honours the rock’s natural challenges. The ethos dictates that the climber must rise to the level of the climb; the climb is not to be brought down to the level of the climber. A route’s challenge, including its lack of protection, is an integral part of its character.
This « Gritstone Philosophy » has shaped the identity of UK climbers for generations. It fosters a powerful mindset focused on self-reliance, mental control, and a leave-no-trace approach. A climber trained on gritstone learns to assess risk, manage fear, and move with precision when protection is marginal or non-existent. This apprenticeship in boldness and judgment is a core part of the experience. Placing a bolt would not only scar the rock permanently but would also erase the psychological puzzle that makes the route what it is.
The Gritstone Philosophy: Leave No Trace as Cultural Identity
Gritstone climbing areas in the UK Peak District represent one of the purest expressions of traditional climbing ethics globally. As detailed by the British Mountaineering Council (BMC), the consensus against permanent protection is near-universal. The philosophy requires climbers to master the psychological challenge of climbing above marginal protection, developing not just physical skills but mental fortitude. This taboo has created a strong Leave No Trace culture, teaching climbers to minimize chalk use, avoid damaging the soft rock, and respect environmental fragility as core values.
The Rockfall Warning Signs Every Climber Misses
In a climbing gym, the only thing that falls is you. Outdoors, the environment is dynamic, and one of the most unpredictable and dangerous objective hazards is rockfall. It can be initiated by climbers above, by rope-drag, by natural weathering, or simply by your own movement. While some rockfall is unavoidable, many incidents are preceded by subtle warning signs that inexperienced climbers often miss. Learning to perform a constant, active « environmental scan » is a critical part of your risk management system.
Your assessment must begin long before you tie in. It starts with an understanding of recent weather. The most dangerous periods are often during the first sunny, warm days after a prolonged freeze. The « freeze-thaw » cycle acts like a powerful jack, where water seeps into cracks, freezes and expands overnight, and then melts, leaving the rock loosened and ready to fall. A beautiful climbing day can be the most hazardous if it follows such a cycle.
At the base of the cliff, look for evidence. Freshly broken rock (talus) with sharp edges and a lighter colour than the surrounding stone is a clear sign of recent activity. Old, stable talus is typically rounded, weathered, and may have lichen growing on it. Look up the intended line of your climb. Are there large, detached-looking blocks or flakes? Can you see dark water streaks indicating paths of moisture that can weaken the rock from within? This active observation is a form of environmental reading, a skill that separates the prepared from the merely hopeful. The risk is real, as highlighted by reports from organisations like the American Alpine Club, which tracked 8 rockfall-related climbing accidents in 2024 in the US alone.
Pre-Climb Scan for Rockfall Risk
- Weather History Assessment: Research recent weather. Have there been freeze-thaw cycles or heavy rain in the last 72 hours? These dramatically increase risk.
- Base Inspection: Scan the cliff base for fresh, sharp-edged talus. This is a clear indicator of recent rockfall events.
- Visual Route Scan: From a safe distance, look for dark water streaks, visible cracks around large blocks, and fresh rock scars where the stone colour is lighter.
- ‘Story of Fracture’ Reading: Differentiate stable cracks (weathered, with dirt or lichen) from dangerous ones (clean, sharp-edged).
- Ledge and Feature Assessment: Pay special attention to ledges above your route. A ledge loaded with loose scree is a « loaded gun » waiting for a rope to dislodge it.
When to Attempt Your First Multi-Pitch Route in North Wales?
The allure of multi-pitch climbing is powerful. The idea of ascending a huge cliff face, pitch by pitch, to stand on a remote summit is what draws many to trad climbing. The mountains of North Wales, with classics like those on Tryfan or in the Llanberis Pass, are a proving ground. However, moving from single-pitch cragging to multi-pitch introduces a significant increase in complexity and commitment. System integrity becomes paramount, as small inefficiencies or mistakes that are manageable near the ground can cascade into serious problems high on a face.
Being « ready » is not about a single grade you can climb. It is about the efficiency and reliability of your systems under fatigue and pressure. Can you and your partner communicate effectively when separated by 50 metres of rope with the wind howling? Can you build a bomber, equalised anchor in under 10 minutes when you’re tired and your hands are cold? Do you have a practised system for belay changeovers to avoid a tangled mess of ropes? These procedural skills are far more important than your physical ability to pull the moves.
Before even considering a multi-pitch route, you must have logged dozens of single-pitch trad leads. You should feel completely comfortable placing gear, building anchors, and managing ropes in a low-stakes environment. A great way to test your readiness is the « Link-Up Day » simulation: climb 3-4 single-pitch routes back-to-back at a crag without returning to the ground, forcing you to perform all the multi-pitch transitions. This reveals any weaknesses in your systems in a controlled setting.
Your Readiness Checklist: First Multi-Pitch
- Anchor Proficiency: Can you consistently build a bomber 3-point equalised anchor in under 10 minutes while in a secure but potentially awkward stance?
- Rope Management: Have you completed your last five climbing days with zero significant rope tangles or management issues during transitions?
- Self-Rescue Knowledge: Do you and your partner know, and have you practised, how to escape a belay and prusik up a rope? Theory is not enough.
- Efficiency and Endurance: Can you comfortably lead 10 single-pitch trad routes in a full day? This simulates the cumulative fatigue of a long route.
- Communication Systems: Do you have established, practised rope signals and changeover procedures that work in noisy or out-of-sight scenarios?
How to Read an OS Map When Your GPS Fails on the Moors?
Your climbing day doesn’t end when you top out the route. Often, the most hazardous part of an adventure in the UK mountains is the descent, especially from the vast, featureless plateaus of areas like the Peak District moors or the Carneddau in Snowdonia. A sudden mist can drop visibility to a few metres, and in these situations, your phone’s GPS is not a primary navigation tool; it is a fallible backup. The ability to navigate using a map and compass is an essential component of your system integrity.
Relying solely on a digital device for mountain navigation is a critical error. Batteries die, screens break, and signals fail. A paper Ordnance Survey (OS) map and a simple baseplate compass are robust, reliable, and require no power. However, they are useless without the knowledge to use them. The core skills are orientating the map to the ground, taking a bearing from a feature, and following that bearing accurately. But for a climber descending in poor visibility, a few specific techniques are life-savers.
The most important is to be proactive. The time to figure out your descent is not when you are lost in the fog, but before you even leave the summit. Identify your target and the general direction on the map while you still have visibility. A key technique is « handrailing »—identifying a linear feature on the map, like a stone wall, a stream, or a sharp ridgeline, that goes in your general direction. By following this feature, you can navigate effectively even with zero visibility. Another is identifying a « catching feature »—a large, unmissable feature like a road or a lake that lies beyond your target. If you hit it, you know you’ve gone too far.
3-Step Emergency Navigation for Descents
- Take a Bearing Before Leaving: While you still have visibility at the summit, take a compass bearing towards your descent route or car. This pre-determined bearing is your lifeline if the mist closes in.
- Use Handrailing: Identify and follow a continuous linear feature on your map that runs in your descent direction, such as a wall, fence, or stream course. This acts as a guide in zero visibility.
- Set a Catching Feature: Before you start, identify a large-scale feature on the map beyond your target (like a road or valley floor). This acts as a safety net to tell you if you’ve overshot your mark.
How to Use Visualization to Calm Nerves Before a Big Drop?
The transition to trad climbing is as much a mental game as a physical one. The fear of falling onto your own gear—the « big drop »—is real and can be paralysing. It can cause you to over-grip, make poor decisions, and climb inefficiently. While physical training is important, managing this fear requires specific mental training. This is cognitive load management. Visualization, or mental rehearsal, is one of the most powerful tools used by climbers and athletes to perform under pressure.
The key is to use visualization not for daydreaming about success, but for detailed, procedural rehearsal. Instead of just picturing yourself at the top, you meticulously rehearse the entire process. This builds neural pathways and muscle memory, making the real-life actions feel familiar and reducing the sense of chaos and uncertainty that fuels fear. When you feel fear rising on a climb, it’s often because your mind is catastrophizing about the unknown. Visualization replaces that unknown with a well-rehearsed plan.
This methodical preparation is a form of meditation. By focusing on the controllable aspects of the system—the placement, the clipping, the communication—you shift your brain from a panicked, emotional state to a logical, problem-solving one. One of the most effective techniques is the « Fear-Setting Exercise, » where you deliberately visualize a fall not as a catastrophe, but as a normal part of the system working correctly: you fall, the gear holds, your belayer catches you, and you carry on. This strips the fall of its terror and reframes it as a manageable event.
System Rehearsal Visualization for Trad Climbing
- Pre-Climb Mental Rehearsal: Before a route, close your eyes and visualize the entire protection sequence. See yourself scanning the rock, selecting the right gear, placing it smoothly, and clipping the rope efficiently.
- Fear-Setting Exercise: The night before, mentally walk through a fall. Visualize falling, the rope coming tight, the gear holding, and the successful catch. This replaces the terror of the unknown with trust in your system. A technique detailed in mental training for climbers.
- Focus Shift Training: During the climb, when you feel fear-based thoughts, consciously interrupt them with a solution-focused question: « Where is my next placement? » or « What is the best stance two moves up? »
- Belay Transition Visualization: For multi-pitch anxiety, mentally rehearse the entire changeover sequence repeatedly until it feels smooth and automatic.
Key Takeaways
- Trad climbing success is defined by the integrity of your entire system—gear, skills, judgment, and mindset—not just physical strength.
- True rock mastery begins with passive protection. Learning to place nuts builds the foundational judgment that all other skills rely upon.
- Procedural discipline is not restrictive; it is liberating. Rigorous, repeatable safety checks free your mind to focus on the climbing.
How to Prepare for a Peak District Hike When Rain Is Forecast?
For a trad climber in the UK, the weather forecast is not just a suggestion; it is the primary determinant of your day. Nowhere is this truer than on the gritstone and sandstone of the Peak District. A forecast of « a bit of rain » is not a minor inconvenience; it is a major event that can render the rock unclimbable and dangerous for days. Understanding the relationship between rain and porous rock is a fundamental aspect of environmental reading.
Gritstone acts like a sponge. When it rains, it becomes saturated, and its internal strength is significantly reduced. Climbing on wet gritstone can cause holds to break, permanently damaging classic routes. Furthermore, gear placements become less reliable in the softened rock. The unwritten rule is clear: you do not climb on wet gritstone. The critical question is, « how wet is too wet? ». It generally requires at least 24 hours of dry, breezy weather for every hour of rain for the rock to dry sufficiently. After a significant downpour, crags can be out of condition for 48-72 hours.
This means that preparation for a climbing trip when rain is forecast is not about better waterproofs; it’s about having better backup plans. A truly prepared climber has already researched alternative objectives. This could mean shifting to a quick-drying limestone crag, tackling a classic mountain scramble that is enjoyable in the wet, or knowing the location of the best climber’s pub for a session of route planning and socializing. Having a Plan B, C, and D is not a sign of pessimism, but of experience. As legendary climber Neil Gresham notes, conditions are everything: « On the wrong day, a warm-up problem can feel impossible, yet on the perfect day a dream project can fall with minimal effort. »
Gritstone Climber’s Wet Weather Strategy
- Pre-Trip Assessment: If rain is forecast within 24 hours of your planned climbing day, assume the gritstone will be unclimbable and pivot to an alternative objective.
- Alternative Objectives: Before you leave home, research backup plans: quick-drying limestone crags, classic mountain scrambles, or sheltered bouldering caves.
- Wet Day Kit: Beyond standard hiking gear, pack belay gloves for wet ropes, a synthetic insulated jacket (down is useless when wet), and an emergency bothy bag.
- Post-Rain Rock Assessment: If you think the rock might be dry, perform the « palm test ». Press your palm firmly on the rock. If it leaves a wet imprint or feels cool and clammy, it is still saturated.
The mountains are not a gym. They demand respect, not just performance. Your transition from an indoor environment to the wild challenges of trad climbing is a journey of apprenticeship. The skills outlined here—systems thinking, procedural discipline, and environmental reading—are your curriculum. Your next step is not to conquer a grade, but to apply this knowledge. Find a qualified instructor or an experienced mentor, and begin the real journey with humility and preparation.