Saving 20% on your self-build is not about finding cheaper trades; it’s about imposing the rigorous financial and operational discipline of a commercial construction site on your project.
- Budget overruns are not random; they are a systemic failure caused by optimism and a lack of risk management.
- Control is achieved through non-negotiable systems: milestone-based payments, critical path scheduling, and a weekly operational cadence.
Recommendation: Immediately implement a three-tier contingency fund and a milestone-based payment schedule. These two systems alone will protect your cash flow and prevent catastrophic budget creep.
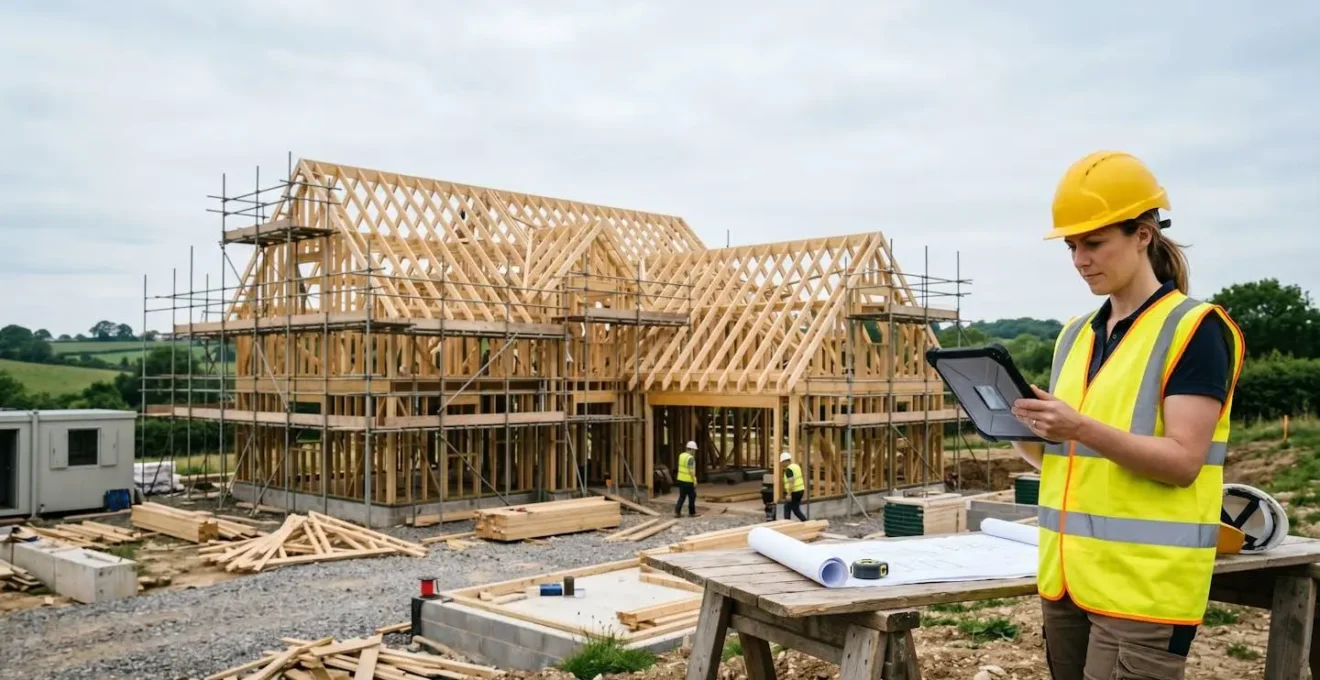
Taking on the role of project manager for your own self-build is the ultimate high-stakes gamble. The promise is a significant saving, often touted as 20% or more, by cutting out the main contractor’s margin. For a brave individual in the UK, this can mean the difference between a standard house and a dream home. However, the reality for most is a brutal collision with budget overruns, crippling delays, and immense personal stress. The common advice—get three quotes, make a plan—is dangerously simplistic. It treats a complex construction project like a shopping trip.
The truth is that professional contractors don’t save money because they know a secret supplier; they save money because they are masters of risk mitigation and process control. They understand that a project’s success is determined long before the first shovel hits the ground, through disciplined pre-construction planning and rigid on-site execution. They don’t just hope for the best; they plan for the worst.
But what if the core problem isn’t your choice of builder, but your entire mindset? This guide abandons the generic tips. It provides the disciplined, no-nonsense framework a veteran construction manager uses. We will not talk about passion or vision. We will talk about financial control, liability, and the operational cadence required to force a project to stay on budget. This is not a guide for hobbyists; it is a field manual for taking command of your build and your balance sheet.
By dissecting the critical systems from budget control to plot assessment, you will learn to operate not as an enthusiastic homeowner, but as the disciplined general of your own construction site. The following sections provide the operational blueprint to make that 20% saving a calculated outcome, not a hopeful gamble.
Summary: How to Project Manage Your Own Self-Build and Systematically Save 20% on Costs
- Why Most Self-Builds Go Over Budget by 25% and How to Stop It?
- Architect or Architectural Technologist: Who Do You Need for Plans?
- When to Order Windows to Avoid Halting the Entire Build?
- The Health & Safety Liability You Accept When Managing Your Own Build
- How to Run a Monday Morning Site Meeting That Keep Trades on Track?
- How to Create a Payment Schedule That Protects Your Cash Flow?
- How to Design a Layout That Reduces Structural Steel Costs?
- How to Assess a Plot’s Potential Before Making an Offer?
Why Most Self-Builds Go Over Budget by 25% and How to Stop It?
The primary reason self-builds go over budget is not bad luck; it’s a psychological flaw known as optimism bias. Amateur project managers systematically underestimate costs and timelines because they fail to plan for what can, and will, go wrong. This isn’t just a theory; research from Queen’s University Belfast confirms that even professionals exhibit this bias, particularly regarding factors like site conditions and labour, leading to flawed estimates. As the project manager, you must assume your initial budget is wrong and build a system to absorb shocks.
A simple contingency fund of 10-15% is inadequate because it treats all risks as equal. A professional system uses a tiered approach to allocate funds with discipline. The first tier is for « known-unknowns »—predictable issues like a week of bad weather or minor material price hikes. The second, larger tier is for « unknown-unknowns, » the genuine surprises like discovering a mains sewer running through your foundation trench. The final tier is a locked fund for design upgrades, which forces a non-negotiable rule: any upgrade must be funded by a downgrade elsewhere. This prevents « scope creep » from silently destroying your budget.
This three-tier contingency system is not just a savings account; it’s a risk management tool. You must track spending against each fund separately on a weekly basis. If you see your « known-unknowns » fund depleting too quickly in the first month, it’s a red flag indicating a systemic issue with your initial estimates or site management that requires immediate correction, not hope.
Architect or Architectural Technologist: Who Do You Need for Plans?
Your first major cost-control decision happens before any ground is broken: choosing your design professional. This is not simply about aesthetics; it’s a strategic choice between vision and pragmatism. An architect is trained in spatial design and creative vision, ideal for a unique, statement project. An Architectural Technologist (AT) is a specialist in the science of building, focusing on technical compliance, construction detailing, and cost-efficient processes. For a self-build PM focused on budget, this distinction is critical.
As the blueprint detail above suggests, the value is in the execution. While an architect can design a beautiful space, an AT excels at ensuring it can be built efficiently and within regulatory guidelines, often leveraging Building Information Modeling (BIM) to de-risk the construction phase. Their fee structure also reflects this focus: an architect typically charges 8-15% of the build cost, whereas an AT may charge 1-3%. For a project where budget discipline is paramount, an AT often presents a more financially sound option, provided your design aspirations are not exceptionally complex.
The following table provides a clear decision matrix. Analyse it not based on which is « better, » but on which aligns with your primary objective: architectural statement or financial control.
| Factor | Architect | Architectural Technologist |
|---|---|---|
| Primary Focus | Aesthetics, spatial design, creative vision | Technical buildability, construction details, code compliance |
| Best For | Unique designs, complex sites, architectural statement projects | Cost-efficient standard designs, optimized construction processes |
| Training | 5+ year professional degree, extensive design education | 3-4 year technical diploma, construction-focused training |
| Typical Fee Range | 8-15% of construction value | 1-3% of construction value |
| Project Management Role | Holistic oversight, design leadership, stakeholder coordination | Technical execution, detailed drawings, specification coordination |
| Software Expertise | CAD, rendering, conceptual modeling | BIM (Building Information Modeling), technical CAD, engineering coordination |
When to Order Windows to Avoid Halting the Entire Build?
A self-build project is a sequence of dependent tasks. A delay in one critical item can cause a catastrophic domino effect, halting all subsequent work while your costs—labour, scaffolding hire, insurance—continue to mount. Windows are the classic example of a long-lead-time item that can derail a project. Once the structural frame is up, the building must be made weathertight before first-fix trades like electricians and plumbers can begin. If your windows haven’t arrived, the entire site grinds to a halt.
You must operate with a professional’s understanding of procurement schedules. It is not enough to know you need windows; you must know their specific lead time and order them at the correct point in the programme. According to industry suppliers, standard replacement windows require 6-12 weeks, while some bespoke door designs can take over 16 weeks. You must order them once the structural openings are confirmed in the final plans, long before the framing even begins. Waiting until the openings are built is a rookie mistake that guarantees weeks of costly downtime.
This principle extends beyond windows. You must identify the top 5 long-lead items for your specific build and build your master schedule (your Gantt chart) around their delivery dates. This list always includes:
- Windows & External Doors: Order 16-20 weeks before needed.
- Roof Trusses: Order 8-12 weeks before needed.
- Bespoke Kitchens: Order 12-16 weeks before installation.
- Structural Steel: Order 6-8 weeks before needed.
- Specialist Cladding: Order 6-10 weeks before needed.
Your job as PM is to manage this critical path of procurement ruthlessly. Confirm every lead time in writing before paying a deposit and build a two-week buffer into your schedule after the quoted delivery date. This isn’t pessimism; it’s professional risk management.
The Health & Safety Liability You Accept When Managing Your Own Build
When you take on the role of project manager, you are not just coordinating trades; you are legally assuming the role of ‘Principal Contractor’ under the UK’s Construction (Design and Management) Regulations 2015 (CDM). This is a critical point that most self-builders fail to grasp. You become personally responsible for ensuring the health, safety, and welfare of every single person on your site. This liability is absolute and non-transferable. If a scaffolder falls because of an unsecured ladder, the Health and Safety Executive (HSE) will be investigating you.
This responsibility is not a box-ticking exercise. It requires proactive management: ensuring all workers have the correct PPE, that risk assessments and method statements (RAMS) are in place for high-risk work, that the site is secure, and that welfare facilities are adequate. The cost of failure is not just financial; it can be a criminal prosecution. You must budget for safety compliance—scaffolding inspections, proper signage, site security—from day one. Cutting corners on safety to save a few hundred pounds is the most expensive mistake you can make.
The culture on your site starts and ends with you. Your actions dictate the standard of professionalism. As guidance from industry experts clearly states:
As the project manager, you set the tone. If you tolerate unsafe practices to save time, you are creating a high-risk, high-liability environment.
– Construction Safety Expert Guidance, Project Management Safety Culture Guidelines
Therefore, you must invest in a site-specific health and safety plan, maintain a site safety file, and conduct regular documented inspections. Your first priority every morning is not progress, but safety. This is the non-negotiable mindset of a professional PM.
How to Run a Monday Morning Site Meeting That Keep Trades on Track?
Effective communication on a construction site is not about friendly chats; it’s a disciplined, structured process. The cornerstone of on-site control is the Monday Morning Site Meeting. This is not optional. It is a mandatory 30-minute ritual that sets the tempo for the entire week, identifies conflicts before they derail the schedule, and holds every trade accountable. Without this meeting, you are not managing the project; you are just watching it happen.
The meeting must follow a rigid agenda, known as the « 3 Ps » framework, to remain focused and efficient. First, Progress: each trade lead briefly reports what they completed last week against the plan. No vague answers; you need specific milestones. Second, Plan: each trade declares their critical tasks for the current week. This is where you identify sequence dependencies—the plasterer cannot start if the electrician hasn’t finished chasing walls. Third, Problems: this is an open forum for trades to raise blockers—a missing delivery, an access clash, an information request. Your job is to solve these problems on the spot or assign an action with a deadline.
A key tool for this meeting is a large, visible whiteboard displaying the weekly schedule. As you confirm the plan, you physically update the board, allocating spaces and times. This visual commitment prevents disputes. If a conflict arises, you refer to the master programme and the critical path. The decision must be data-driven, not based on who shouts the loudest. You start on time, you finish in 30 minutes, and you circulate written minutes with action points within two hours. This is the operational cadence that separates a professional site from an amateur’s chaotic money pit.
How to Create a Payment Schedule That Protects Your Cash Flow?
Your single greatest point of leverage over a construction project is control of the money. A poorly structured payment schedule will destroy your cash flow and leave you with zero power if a dispute arises. Never, under any circumstances, agree to a payment schedule based on calendar dates (e.g., « pay 25% at the end of each month »). This is a recipe for disaster, as you risk paying for work that hasn’t been completed to the required standard.
The professional standard is a milestone-based payment schedule. Payments are only released upon the certified completion of pre-defined stages of work. This system transfers the risk of delay from you to the builder. If they are slow, their payments are slow. This aligns everyone’s interests towards progress. A study from the Project Management Institute is relevant here; it found that poor communication is a leading factor in project overruns, and a clear payment schedule is a critical form of communication, contributing to one-third of all construction project failures when managed poorly.
Your contract must detail these stages with absolute clarity. A typical structure would be:
- Stage 1 (20%): Foundations complete to DPC level, verified by Building Control.
- Stage 2 (25%): Structure and roof weathertight, certified.
- Stage 3 (20%): First-fix services complete and pressure-tested.
- Stage 4 (25%): Plastering and second-fix complete.
- Stage 5 (7.5%): Practical completion, less retention.
- Final Payment (2.5%): Retention released 3-6 months post-completion, after all snagging is resolved.
The retention is a small percentage (typically 2.5-5%) of the contract value that you hold back to ensure the contractor returns to fix any defects that appear after they’ve left the site. Without it, you have no leverage. This entire payment structure must be written into your contract (e.g., a JCT Minor Works contract) before any work begins.
How to Design a Layout That Reduces Structural Steel Costs?
Significant cost savings are achieved not by haggling over labour rates, but by making intelligent design decisions at the earliest stage. One of the biggest potential costs in modern open-plan homes is structural steel. Large, uninterrupted spans require substantial steel beams (RSJs or I-beams), which are expensive to buy, fabricate, transport, and install with a crane. As PM, your job is to challenge the design to minimise or eliminate this need without compromising the desired feel of the space.
The most effective strategy is to work with your designer to create a layout that relies on a clear hierarchy of structural solutions. The goal is to use the most cost-effective method possible for any given span. The hierarchy, from cheapest to most expensive, is as follows:
- Load-bearing walls: The ultimate cost-saver. Stacking internal walls directly on top of each other across floors transfers loads straight to the foundations, eliminating the need for any beams.
- Enhanced Timber Joists: Modern engineered timber (I-joists or metal-web « Posi-Joists ») can achieve clear spans of 5-6 metres, sufficient for most residential open-plan areas.
- Glulam Beams: Glued laminated timber beams offer significant strength with a warmer aesthetic than steel and are often easier to install.
- Flitch Beams: A composite of timber and a steel plate, useful for strengthening existing structures or where a steel-strength beam is needed in a timber-sized profile.
- Steel I-Beams: The last resort. Use only where no other solution can achieve the required span. They carry heavy costs for fabrication, delivery, crane hire, and fire protection.
The key is to use design to your advantage. Can a long span be broken by a structural column disguised within a bookcase? Can a partial wall be introduced to support the floor above and allow for cheaper timber joists instead of a huge steel beam? A £15,000 saving can often be found by cleverly designing out a single large steel beam. This is proactive cost management.
Key Takeaways
- Budget overruns are a systemic failure of risk management, not bad luck. A three-tier contingency fund is your primary defence.
- Operational control is maintained through a non-negotiable weekly site meeting with a rigid agenda, focused on progress, plans, and problems.
- Protect your cash flow and gain leverage by using a milestone-based payment schedule with retention. Never pay by the calendar.
How to Assess a Plot’s Potential Before Making an Offer?
The financial success or failure of your self-build is often sealed the moment you purchase the plot. A « bargain » plot can quickly become a money pit if it has hidden issues. As the project manager, your first job is to conduct a ruthless due diligence assessment before you even consider making an offer. You must evaluate the land through the cold, hard lens of a contractor, identifying anything that will add cost and time to your project.
Do not rely on the estate agent’s description. You must walk the plot and score it against critical criteria. Can a large concrete mixer or a crane get access to the proposed footprint, or will you be paying thousands for concrete pumps and manual handling? Are there many mature trees, indicating difficult clay soil and expensive foundations? How far are the utilities? A 100-metre connection to the main sewer can easily cost over £20,000. Is the plot flat, or is it on a slope that will require expensive stepped foundations and retaining walls?
Case Study: The Hidden Costs of a « Cheap » Plot
Analysis of overruns shows how a plot purchased for £50,000 below market value due to ‘poor access’ can be a financial trap. One project incurred an extra £10,000 in crane hire and handling fees. Worse, unexpected clay ground conditions, common on such marginal plots, required a foundation redesign that added £15,000 and three weeks of delay. The ‘cheap’ plot ultimately cost £25,000 more and set the project back by a month before it had even started.
To avoid this fate, you must use a systematic scoring method to quantify the plot’s risk. This turns a subjective feeling into an objective, data-driven decision.
Your 5-Point Plot Assessment Checklist
- Access Review: Can a 32-tonne concrete mixer and a mobile crane access the foundation area directly? Score 10 for direct access, 1 for needing specialist equipment costing over £5,000.
- Ground Risk Assessment: Is the plot on proven good ground (check local geology maps) or on potential fill/clay (indicated by large trees)? Score 10 for solid ground, 1 for unknown conditions requiring a £3,000+ soil investigation.
- Utility Proximity Audit: Pinpoint the exact location of mains water, electricity, gas, and sewerage. Score 10 if all are at the boundary, 1 if any service is 100m+ away, likely costing over £20,000 to connect.
- Topography Impact Analysis: Is the site level or sloped? Score 10 for a flat or gently sloping site, 1 for a steep gradient demanding stepped foundations that will add at least £15,000 to your budget.
- Planning Constraint Check: Are there existing outline planning permissions? Is it in a conservation area or are there any Tree Preservation Orders (TPOs)? Score 10 for full planning with no restrictions, 1 for severe limitations on design.
To successfully bring a self-build in on budget requires transforming from an enthusiastic homeowner into a disciplined, system-driven manager. The principles of tiered contingency, milestone payments, and rigorous site assessment are not optional extras; they are the very foundation of a financially successful project. Applying this commercial mindset is the only reliable way to secure that 20% saving. Your next logical step is to formalise this approach by drafting a robust contract with your first key trade, incorporating a milestone-based payment schedule from day one.