Thinking a trade badge and a good quote means you’re safe? That’s the first mistake.
- A builder’s true competence is revealed not by their accreditations, but by the rigour of their paperwork and the questions they ask you.
- The structure of your payment schedule and the legal difference between an ‘estimate’ and a ‘fixed quote’ are your greatest shields against financial disaster.
Recommendation: Stop assessing builders and start investigating them. Demand a fixed-price quote with itemised specifics for everything, and never release a payment without verifying the corresponding milestone is 100% complete.
The horror stories are everywhere. The half-finished extensions open to the elements, the spiralling costs, the tradespeople who vanish after taking a hefty deposit. It’s enough to give any UK homeowner nightmares. You’re told to « get three quotes » and « check references, » but this superficial advice is dangerously inadequate for dealing with the sophisticated tactics of a modern ‘cowboy’ builder. A slick website and a Federation of Master Builders (FMB) logo are no longer guarantees of quality; they are often just the first layer of a carefully constructed façade.
This is not a guide about finding a friendly builder. This is a manual on how to conduct a forensic investigation. The underlying principle is simple: assume nothing, verify everything. We will move beyond the platitudes and into the realm of rigorous, system-based vetting. You will learn how to weaponise your payment schedule, why a « fixed quote » is your only real contractual shield, and how to spot the subtle behavioural red flags that betray a builder’s true intentions. This process isn’t about being difficult; it’s about taking control and ensuring the thousands of pounds you’re about to invest are protected. It’s time to turn your fear into a finely-tuned detection system.
This guide provides a step-by-step framework to investigate potential builders. We will dissect the process from initial checks to final inspections, equipping you with the tools and mindset needed to secure your project and your peace of mind.
Summary: The Definitive Guide to Vetting UK Builders and Dodging the Cowboys
- Why Checking the FMB Badge Is Not Enough to Guarantee Quality?
- How to Create a Payment Schedule That Protects Your Cash Flow?
- Estimate vs Fixed Quote: Which One Stops Costs Spiraling?
- The Behavioral Red Flags During a Builder’s First Visit
- When to Contact Builders if You Want Work Done by Christmas?
- The Health & Safety Liability You Accept When Managing Your Own Build
- The Risk of Using ‘Cheap’ Inspectors Who Cut Corners
- How to Pass Your EICR and Gas Safety Inspections First Time?
Why Checking the FMB Badge Is Not Enough to Guarantee Quality?
The Federation of Master Builders (FMB) logo on a van or website feels reassuring, a hallmark of quality in a chaotic market. This feeling is precisely what cowboy builders exploit. While the FMB represents many of the UK’s best tradespeople, membership alone is not a failsafe guarantee. The reality is that basic membership tiers may not involve the rigorous physical inspections you assume. Furthermore, a determined charlatan can easily use an expired or even fake logo. According to a 2025 Federation of Master Builders survey, 37% of UK adults have hired a builder who turned out to be unreliable. This is why your vetting must go deeper.
Treat the FMB badge not as a destination, but as a starting point for your investigation. Your first step is to use the official ‘Check a Member’ tool on the FMB website. This confirms if their membership is current. But don’t stop there. Ask the builder directly about their membership level. Have they undergone physical inspections of their work? Have they passed financial checks? A confident, professional builder will welcome these questions and readily provide evidence. This is your first competence stress-test.
True vetting requires cross-referencing. A builder’s FMB status is one piece of a larger puzzle. You must also check their trading history on Companies House for signs of recently dissolved companies (a major red flag). For specific jobs, you must verify their credentials with the relevant bodies: Gas Safe for heating, NICEIC or NAPIT for electrics. This forensic approach moves you from a passive customer to an active investigator. The goal is to build a complete picture based on verified facts, not on a logo alone.
Your Action Plan: The FMB Cross-Reference Checklist
- Verify FMB membership online using the official ‘Check a Member’ tool on the FMB website to confirm the builder is currently registered.
- Check the company’s trading history and director information on the UK Companies House register to assess company age and stability.
- Request proof of the builder’s specific accreditation tier – ask whether they underwent physical work inspections and financial checks beyond basic membership.
- Cross-reference with specialized credentials relevant to your project: Gas Safe Register for heating work, NICEIC or NAPIT for electrical work, or LABC Partner Scheme for complex structural projects.
- Request the builder’s public liability and employer’s liability insurance certificates directly, and verify validity dates and coverage amounts independently.
This multi-layered verification process is non-negotiable. It’s the foundation upon which all other vetting activities are built. Skipping this stage is like building a house with no foundations.
How to Create a Payment Schedule That Protects Your Cash Flow?
Money is a builder’s lifeblood, but for you, it’s a tool of control. A poorly structured payment schedule is the single biggest mistake a homeowner can make, leaving you powerless and financially exposed. Never, under any circumstances, pay a large deposit upfront. A request for more than 10-15% to « buy materials » is a monumental red flag. Competent builders have trade accounts and sufficient cash flow to begin work. An upfront payment essentially gives the builder an unsecured, interest-free loan with your money.
The only sane way to structure payments is a milestone-based schedule. This means you only release funds after a specific, pre-agreed, and verifiable stage of work is 100% complete. This turns your payments into a ‘contractual shield’. For example, on an £85,000 extension, a safe schedule might look like this: 10% on signing, 25% on completion of foundations and watertight structure, 30% after first-fix electrics and plumbing, 25% at second-fix, and a final 10% retention. Each payment is earned, not gifted.
A crucial part of this process is the « retention. » It is standard practice to withhold a portion of the final payment for a set period (e.g., 3-6 months) after practical completion. This is your leverage to ensure any snagging issues or defects that appear after the builders have left are fixed promptly. While amounts vary, industry data shows that 3% to 5% of the contract sum is a typical retention amount in UK construction. A builder who resists a milestone schedule or a retention clause is telling you they lack confidence in their own work or financial stability. Listen to that warning.
By linking payments directly to tangible progress, you maintain control throughout the project and ensure you always hold the power, not the builder.
Estimate vs Fixed Quote: Which One Stops Costs Spiraling?
The words ‘estimate’ and ‘quote’ are often used interchangeably, a confusion that cowboy builders relish. Understanding the legal difference is critical to protecting your finances. An estimate is a guess. It is not legally binding. While under the Consumer Rights Act 2015 the final price must be ‘reasonable’, this is a vague term that is difficult and expensive to challenge in court. An estimate is an open invitation for costs to spiral, with ‘unexpected issues’ and ‘additional materials’ constantly added to the bill.
A fixed-price quote (or ‘quotation’) is a legally binding contract. Once you accept it in writing, the builder is obligated to complete the specified work for the specified price. This is your most powerful weapon against cost creep. A professional builder working on a project with a clear scope will always provide a fixed quote. A builder who is reluctant to do so or insists on an ‘estimate’ for a defined project is often planning to exploit the ambiguity. They are ‘baiting’ you with a low initial number, fully intending to switch to a much higher final price.
The power of a fixed quote lies in its detail. A one-page quote is worthless. A true contractual shield is a multi-page document that itemises everything. It must include a detailed scope of works, specific brands and models for all materials (e.g., ‘Velux GGL SK06’ not just ‘roof window’), a clear breakdown of labour and material costs, VAT as a separate item, and a list of exclusions. The more detail, the less wiggle room for the builder to add extra costs later. Always insist on this level of granularity. It’s a key part of your forensic vetting process.
The following table, based on UK consumer law, highlights the critical differences. Your goal should always be to operate in the left-hand column.
| Aspect | Fixed Quote (Quotation) | Estimate |
|---|---|---|
| Legal Status | Legally binding contract once accepted by client | Non-binding indication of approximate cost |
| Price Change Allowed | No – price cannot increase unless variations agreed in writing | Yes – final price can differ, but must be ‘reasonable’ under Consumer Rights Act 2015 |
| Client Protection | Full protection – builder must honour quoted price | Limited – client can challenge ‘unreasonable’ final price but burden of proof falls on client |
| When to Use | Defined scope projects with clear specifications | Exploratory or repair work where full scope unknown |
| Risk for Client | Low – cost certainty provided | High – vulnerable to ‘bait and switch’ tactics |
| Builder’s Obligation | Must complete work as specified for quoted price | Can add extras and increase price if ‘reasonable’ |
Demanding a detailed, fixed-price quote is not being difficult; it is the minimum standard of professionalism you should accept. It filters out the chancers from the true professionals.
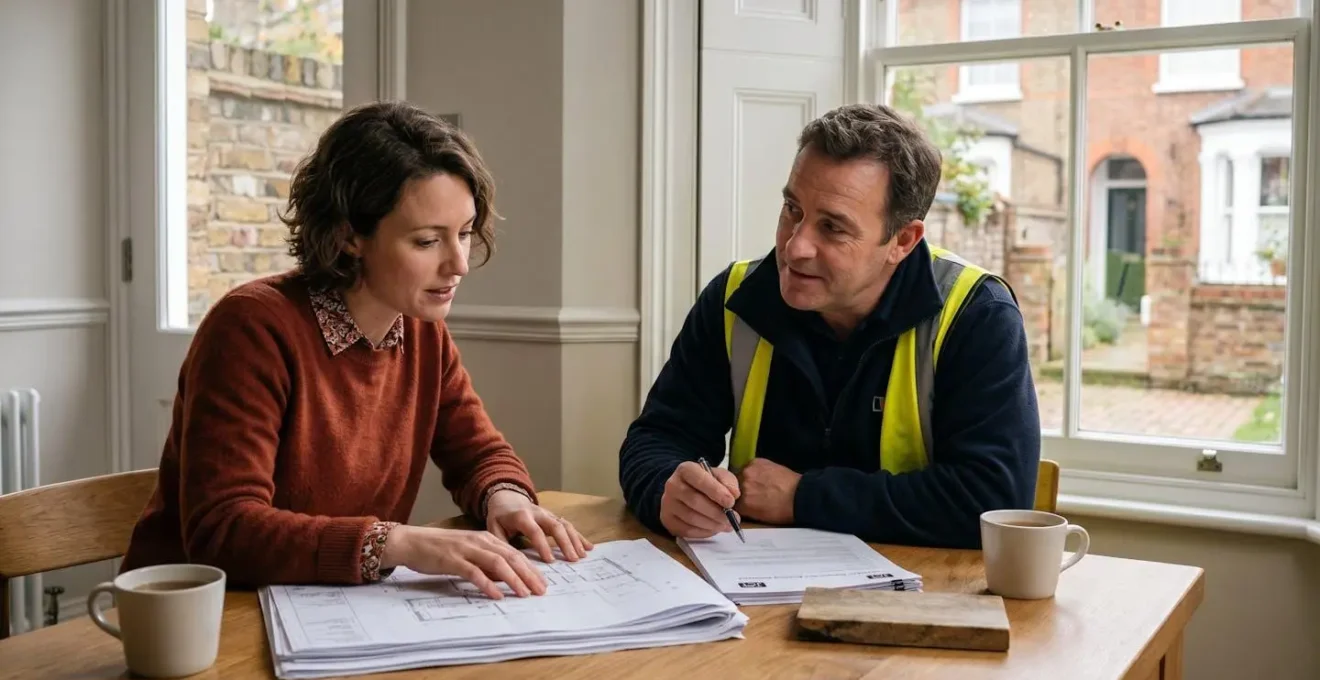
The Behavioral Red Flags During a Builder’s First Visit
Long before any contract is signed, a builder’s true character is revealed through their behaviour. The first site visit is a critical intelligence-gathering opportunity for you. You are not just getting a price; you are conducting a psychological assessment. A cowboy builder is focused on one thing: getting the job and the first payment. A professional builder is focused on understanding the project, managing your expectations, and assessing feasibility. This is where you practice behavioural forensics.
Pay close attention to the questions they ask—or don’t ask. A good builder will ask about you: your lifestyle, how you use the space, your long-term plans for the property. They want to understand the ‘why’ behind the project. A cowboy just wants to know the ‘what’ so they can price it. A professional will want to discuss your budget early on to ensure they are not wasting your time or theirs. A cowboy avoids the budget talk, preferring to hook you with a low price and inflate it later. A professional talks about potential disruption and how to manage it; a cowboy dismisses it with a vague « don’t worry about it. »
Your own preparation is key to this test. Before they arrive, prepare a ‘vetting pack’: architectural drawings, a list of specific questions, and maybe even a draft JCT (Joint Contracts Tribunal) minor works contract. How they react to this pack is incredibly revealing.
Case Study: The North London Vetting Pack Test
A homeowner in North London prepared a vetting pack including architectural drawings, a detailed question list, and a draft JCT contract before meeting three shortlisted builders. Builder A became defensive, claiming the pack was ‘over the top for a simple extension.’ Builder B welcomed it but admitted he’d need to review it with his solicitor as he’d never used JCT contracts. Builder C immediately engaged with the documents, answered questions on the spot, and offered to mark up the drawings with his proposed methodology. The homeowner hired Builder C. The project completed on time and under budget, with Builder C’s professionalism during the vetting stage proving to be an accurate predictor of performance.
The builder’s attitude towards your diligence is the single most important predictor of future behaviour. A builder who is irritated by your questions, dismissive of your concerns, or rushes you for a decision is broadcasting their unprofessionalism. Trust your gut. If someone makes you feel uncomfortable or pressured, walk away, no matter how attractive their price.
This early-stage analysis is not optional; it’s the most cost-effective due diligence you will ever do. A few uncomfortable questions now can save you tens of thousands of pounds and months of heartache later.
When to Contact Builders if You Want Work Done by Christmas?
The dream of a new kitchen or extension ready for Christmas is a powerful one, but it’s also a trap that forces homeowners into rushed, poor decisions. Good builders are in high demand and are often booked up 6-12 months in advance. The idea that you can start looking for a builder in September for a significant pre-Christmas project is a dangerous fantasy. This desperation is what cowboy builders prey on, promising unrealistic timelines they have no intention of meeting.
To have any chance of a Christmas completion, you must reverse-engineer your timeline with a heavy dose of realism. The process of finding, vetting, and contracting a builder is not quick. If you want work completed by late November, you need to be making first contact with potential builders in late Spring, around June. This allows for a month of initial visits and shortlisting, a month for detailed quotes and reference checks (July), and a month for final negotiations and contract signing (August). This would likely put the builder on-site by mid-to-late September, giving them only two to three months to complete the work. This is a tight schedule for anything other than a simple, small-scale project.
The current market pressure makes this even more critical. With 85% of UK homeowners reporting that builder costs have risen and availability is tight, the best tradespeople have their pick of jobs. They will favour well-planned projects with clients who are organised and have all their ducks in a row (e.g., planning permission, architectural drawings). A last-minute, panicked client is unattractive. Starting your search early not only gives you access to a better pool of builders but also puts you in a stronger negotiating position. You are vetting them from a position of calm control, not frantic need.
In short, if you’re reading this in the autumn and hoping for a new extension by Christmas, the safest and most sensible decision is to aim for Easter instead. Use the intervening months to plan, save, and conduct your forensic vetting process without the pressure of an impossible deadline.
The Health & Safety Liability You Accept When Managing Your Own Build
In a bid to save money, some homeowners are tempted to manage their own projects, hiring individual trades directly. This is an exceptionally dangerous path, not just for the quality of the build, but for your legal and financial wellbeing. Under the Construction (Design and Management) Regulations 2015 (CDM), if you are managing the project, you become the ‘client’ with significant legal responsibilities for health and safety on your site. Ignorance of the law is no defence. If a tradesperson is injured on your property due to unsafe conditions, you could be held liable, facing hefty fines or even prosecution by the Health and Safety Executive (HSE).
By appointing a competent builder as the ‘Principal Contractor’, you legally transfer the majority of these responsibilities to them. It is their job to create a Construction Phase Plan, manage site safety, coordinate trades, and provide adequate welfare facilities. A key part of your vetting process must be to stress-test their competence in this area. Ask them directly: « Who will be the appointed Principal Contractor? » and « Can I see a sample Construction Phase Plan from a similar project? » A blank stare or a dismissive answer is a sign of a dangerously incompetent operator.
The risk is compounded by the financial precarity of the industry. The construction sector has a notoriously high rate of insolvency. Industry data shows that 17% of all insolvencies in England and Wales in a recent 12-month period were construction companies. If you hire a ‘cheap’ builder who cuts corners on safety, they are also likely cutting corners on their business finances. When they inevitably go bust mid-project, you are left not only with an unfinished build but also with a potentially unsafe site for which you are legally responsible. Appointing a professional Principal Contractor with a proven track record and robust insurance is not a luxury; it is essential liability protection.
Ultimately, the fee you pay a good main contractor is not just for building work; it’s an insurance premium against legal, financial, and safety-related catastrophe.
Key Takeaways
- Assume nothing, verify everything: A trade badge is a starting point, not a guarantee. Use online tools and ask direct questions about accreditation levels.
- Control the cash flow: Use a milestone-based payment schedule and a retention clause. Never pay significant amounts upfront. Your money is your control.
- Demand a fixed-price quote: An ‘estimate’ is a guess; a detailed ‘fixed quote’ is a legally binding contract. The detail in the paperwork reveals the quality of the builder.
The Risk of Using ‘Cheap’ Inspectors Who Cut Corners
Hiring an independent inspector or surveyor to check your builder’s work at key stages seems like a sensible move. However, this creates another vetting challenge: how do you ensure the person checking the work isn’t cutting corners themselves? The market is filled with individuals offering ‘snagging reports’ or ‘quick inspections’ for a tempting low price. This is a false economy of the most dangerous kind. A cheap inspection is often worse than no inspection at all, as it provides a false sense of security while missing critical, often structural, defects.
A professional building surveyor, typically a member of the Royal Institution of Chartered Surveyors (RICS), is bound by a strict code of conduct and must carry substantial Professional Indemnity (PI) insurance. This is your protection. Their inspection will be methodical, evidence-based, and result in a detailed report with photographic evidence, referencing specific building regulations that have been breached. A cheap inspector, by contrast, may perform a superficial visual check, lack the expertise to identify serious structural or safety issues, and have inadequate insurance to cover the cost if they get it wrong. Their report may be vague and lack the technical authority to compel a reluctant builder to perform remedial work.
Case Study: The £9,500 Investment
A homeowner in Birmingham was quoted £350 for a ‘quick inspection’ and £500 for a comprehensive RICS surveyor inspection of a loft conversion. Choosing the more expensive option, the RICS surveyor identified inadequate structural support in the floor joists, missing fire-stopping (a Building Regulations breach), and improper insulation. The builder initially quoted £2,500 to fix the issues, but the surveyor’s detailed photographic evidence and regulation references forced the builder to complete all remedial work at no additional cost. The £500 inspection effectively prevented over £10,000 in future structural problems and ensured the project could be signed off by Building Control, representing a net saving of £9,500.
When vetting an inspector, your process must be as rigorous as when vetting your builder. Verify their professional memberships (e.g., RICS), check their PI insurance level (a minimum of £1m is essential), and ask for a sample report to assess its quality and detail. Crucially, ensure they have no commercial relationship with your builder. Their independence is the entire point of the exercise.
Hiring a cheap inspector to save a few hundred pounds is like hiring a budget parachute packer. It’s an insane gamble that you will almost certainly lose in the long run.
How to Pass Your EICR and Gas Safety Inspections First Time?
The final hurdle of any construction project is passing the mandatory safety inspections, principally the Electrical Installation Condition Report (EICR) and the Gas Safety Certificate. A failure here is not just a bureaucratic headache; it’s a sign that the work is non-compliant and potentially dangerous. The key to passing first time is not about last-minute panic, but about a strategy of documentation and preparation that begins on day one of the project.
Your builder must use appropriately qualified and registered tradespeople (e.g., a NICEIC-registered electrician, a Gas Safe-registered engineer) who can self-certify their own work and issue the relevant minor works certificates as they go. You must collect and file these documents throughout the project. They form a critical part of the evidence chain. However, you cannot simply trust that this is being done correctly. A powerful strategy is to create your own photographic record.
Before any walls or floors are closed up, take hundreds of photos. Document the routes of all electrical cables, the positions of junction boxes, the layout of plumbing pipework, and the installation of structural supports. This is not paranoia; it is prudent evidence gathering.
Case Study: The Photographic Evidence Strategy
A homeowner in Manchester documented their renovation with over 400 timestamped photographs, capturing all concealed electrical and plumbing work. When the Building Control inspector arrived, elements that would be impossible to verify (like cable routing in walls) were quickly approved based on the photographic evidence. The inspector noted the documentation was ‘exceptional’ and it reduced inspection time by over an hour. When a minor electrical issue was queried, the photos proved the electrician had installed it correctly to regulations, protecting both the homeowner and the tradesperson from liability. The project passed all inspections first time with zero re-works required.
In the days before the final inspection, conduct your own pre-flight check. Ensure clear, unobstructed access to the consumer unit (fuse box) and gas meter. Test every light switch, socket, and appliance. Test smoke and heat alarms. This simple preparation prevents trivial failures that can delay sign-off and cost you a re-inspection fee. Providing the inspector with a well-organised file of certificates and your photographic record demonstrates a high level of diligence and professionalism, setting a positive tone for the entire inspection.
By applying this forensic, evidence-based approach from the very beginning, you transform the inspection from a stressful ordeal into a simple, final confirmation of a job well done.